
General Information About the Point of Sale System
General Information About the Point of Sale (POS) System
This article covers the functions and menu options in the Acendy POS system.
Home/Front Page

- Main Menu
- Opens the search field
- Shows the selected seller/user. Click the name to open the seller menu
- Icon for the bank terminal. This lights up green when the terminal is connected. Click the icon to go to terminal settings
- Shows the selected customer. Click the name/icon to select a customer or add a new customer. The default choice is end customer/cash customer
- Brands/Manufacturers
- Category selection. Here you can choose favorite categories (see also point 11) and determine the display of categories
- Add a generic product (miscellaneous product) or gift card via this button
- Set a percentage discount for the entire shopping cart
- Empty the entire shopping cart
- Favorite categories. If you have categories that you want to quickly navigate to (see also point 7)
- Featured products/favorite products. Set via product info in the product boxes
- Categories
- Payment methods
Main Menu
Access the main menu in the POS system by clicking the menu icon in the top left corner of the app.
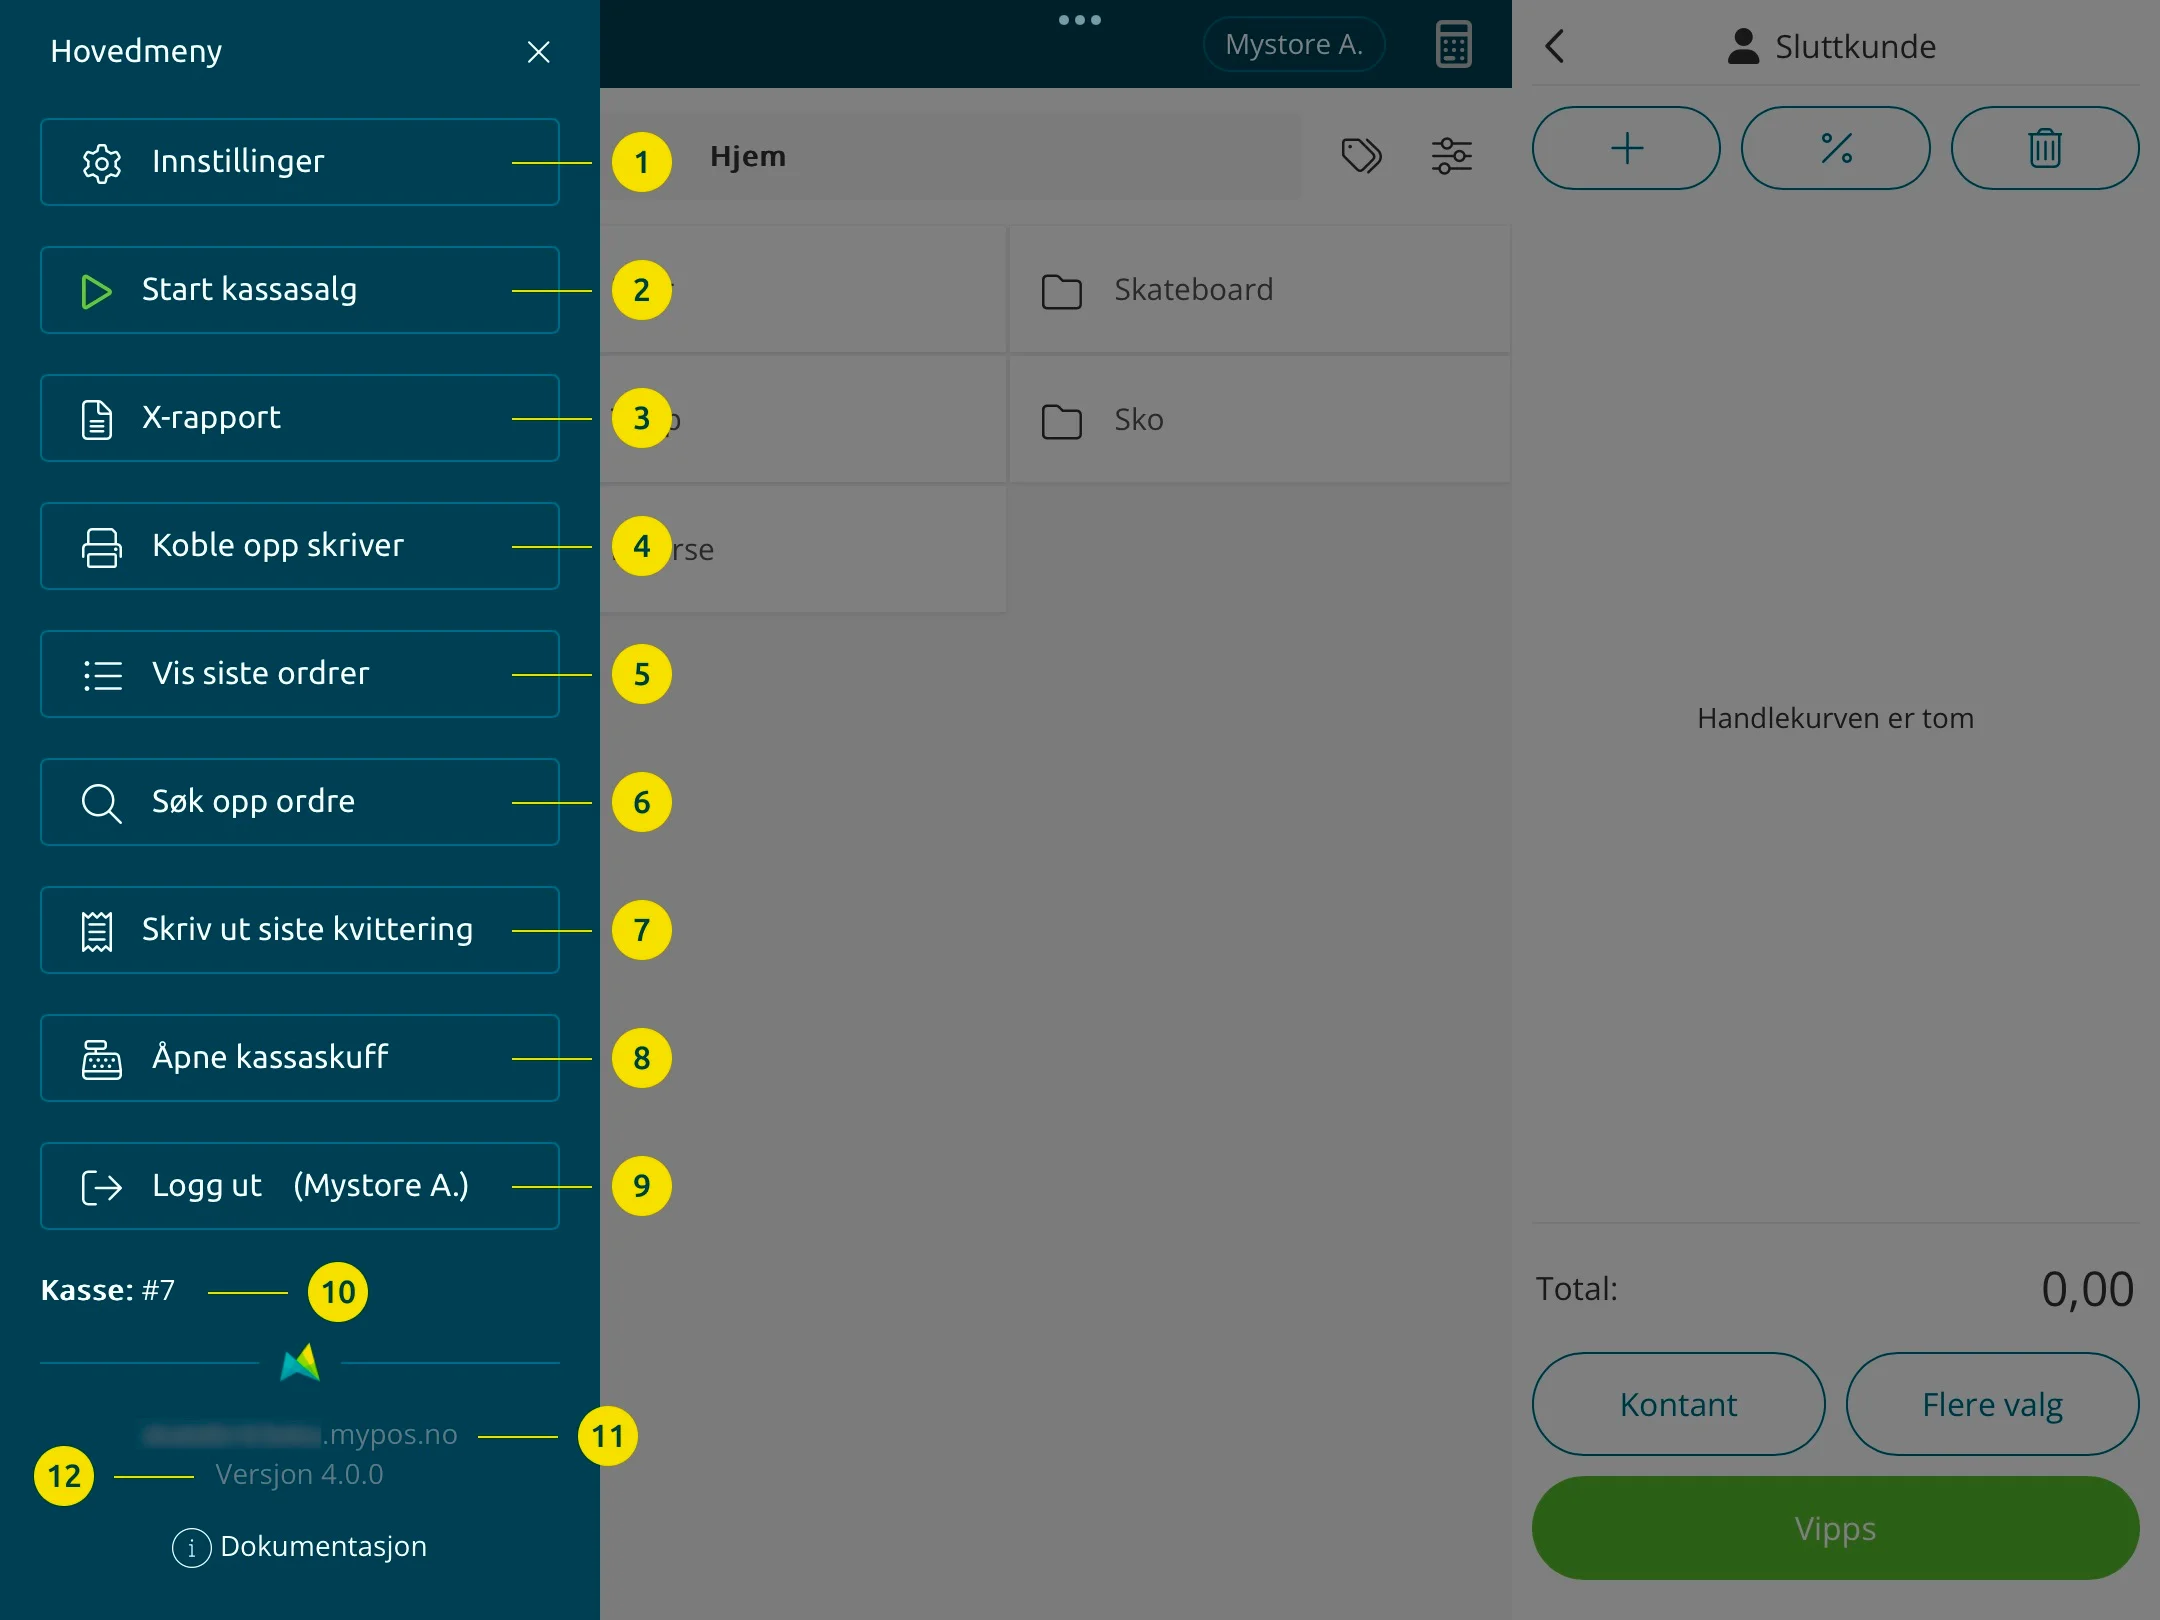
- Opens settings
- Start cash register sale/session
- Shows turnover for the current session. Can also be printed
- Click here to connect to or check the connection status of the receipt printer
- Opens a list/menu with the latest orders from all POS locations, refunds (to bank cards) and orders from the online store
- Click here to search for an order
- Prints the last receipt (if a receipt printer is connected)
- Opens the cash drawer if connected
- Click here to log out. The name in parentheses shows the logged-in user
- Shows the POS ID. Read more
- Store name/address
- Version of Acendy POS
- Stop cash register sale/session (settlement/reconciliation)
- Shows the ID of the current session (z-report)
Category Page
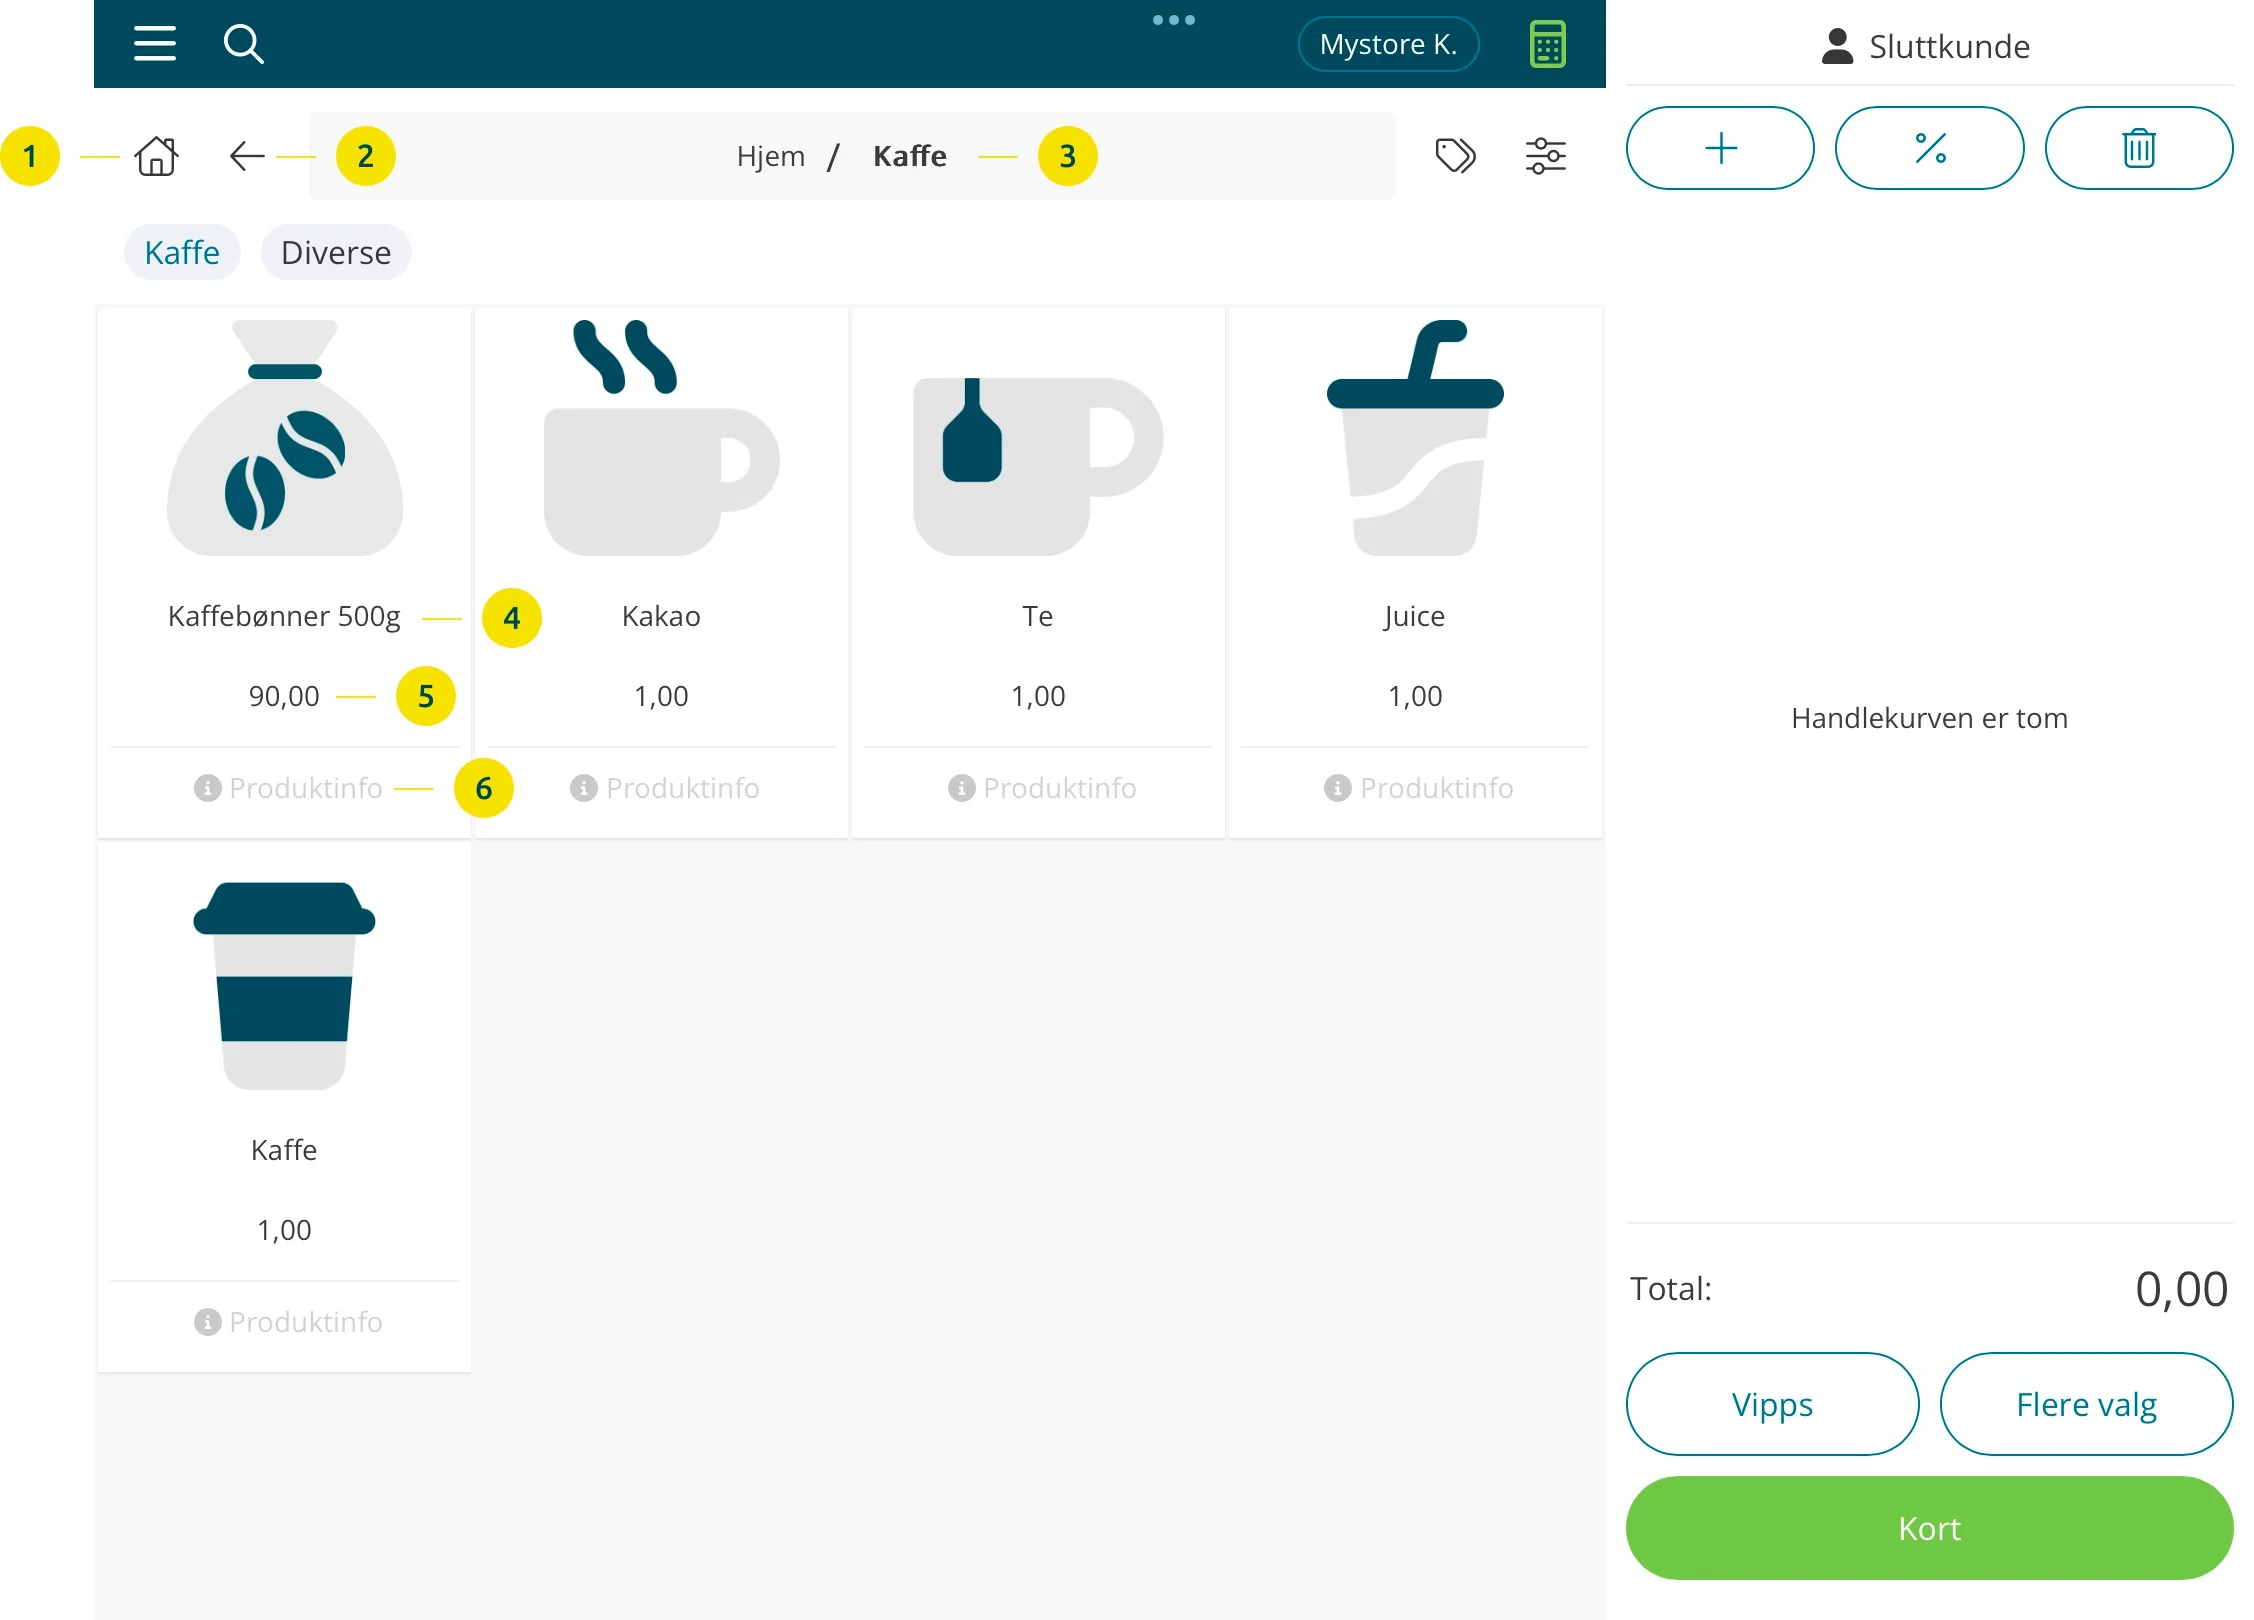
- Home icon. Takes you to the front page
- Back arrow. Takes you one step back
- Breadcrumb. Shows where you are in the category structure. Category names can be clicked for quick navigation
- Product name
- Product price
- Opens product information
Product Information

- Favorite star. Mark to set the product as a favorite/featured product. The product will then be displayed on the front page (displayed above the categories)
- Product data retrieved from the product card in the control panel (price, margin, manufacturer, article number, EAN, stock location and stock balance)
- Product data retrieved from the product card in the control panel. If the product has variants, you will see all the variants in a table, with stock balance, article number, EAN and stock location per variant (if applicable). Product description and product properties will also be displayed here, if entered on the product.
Settings
Click on the menu item Settings in the main menu to open the modal for settings.
General
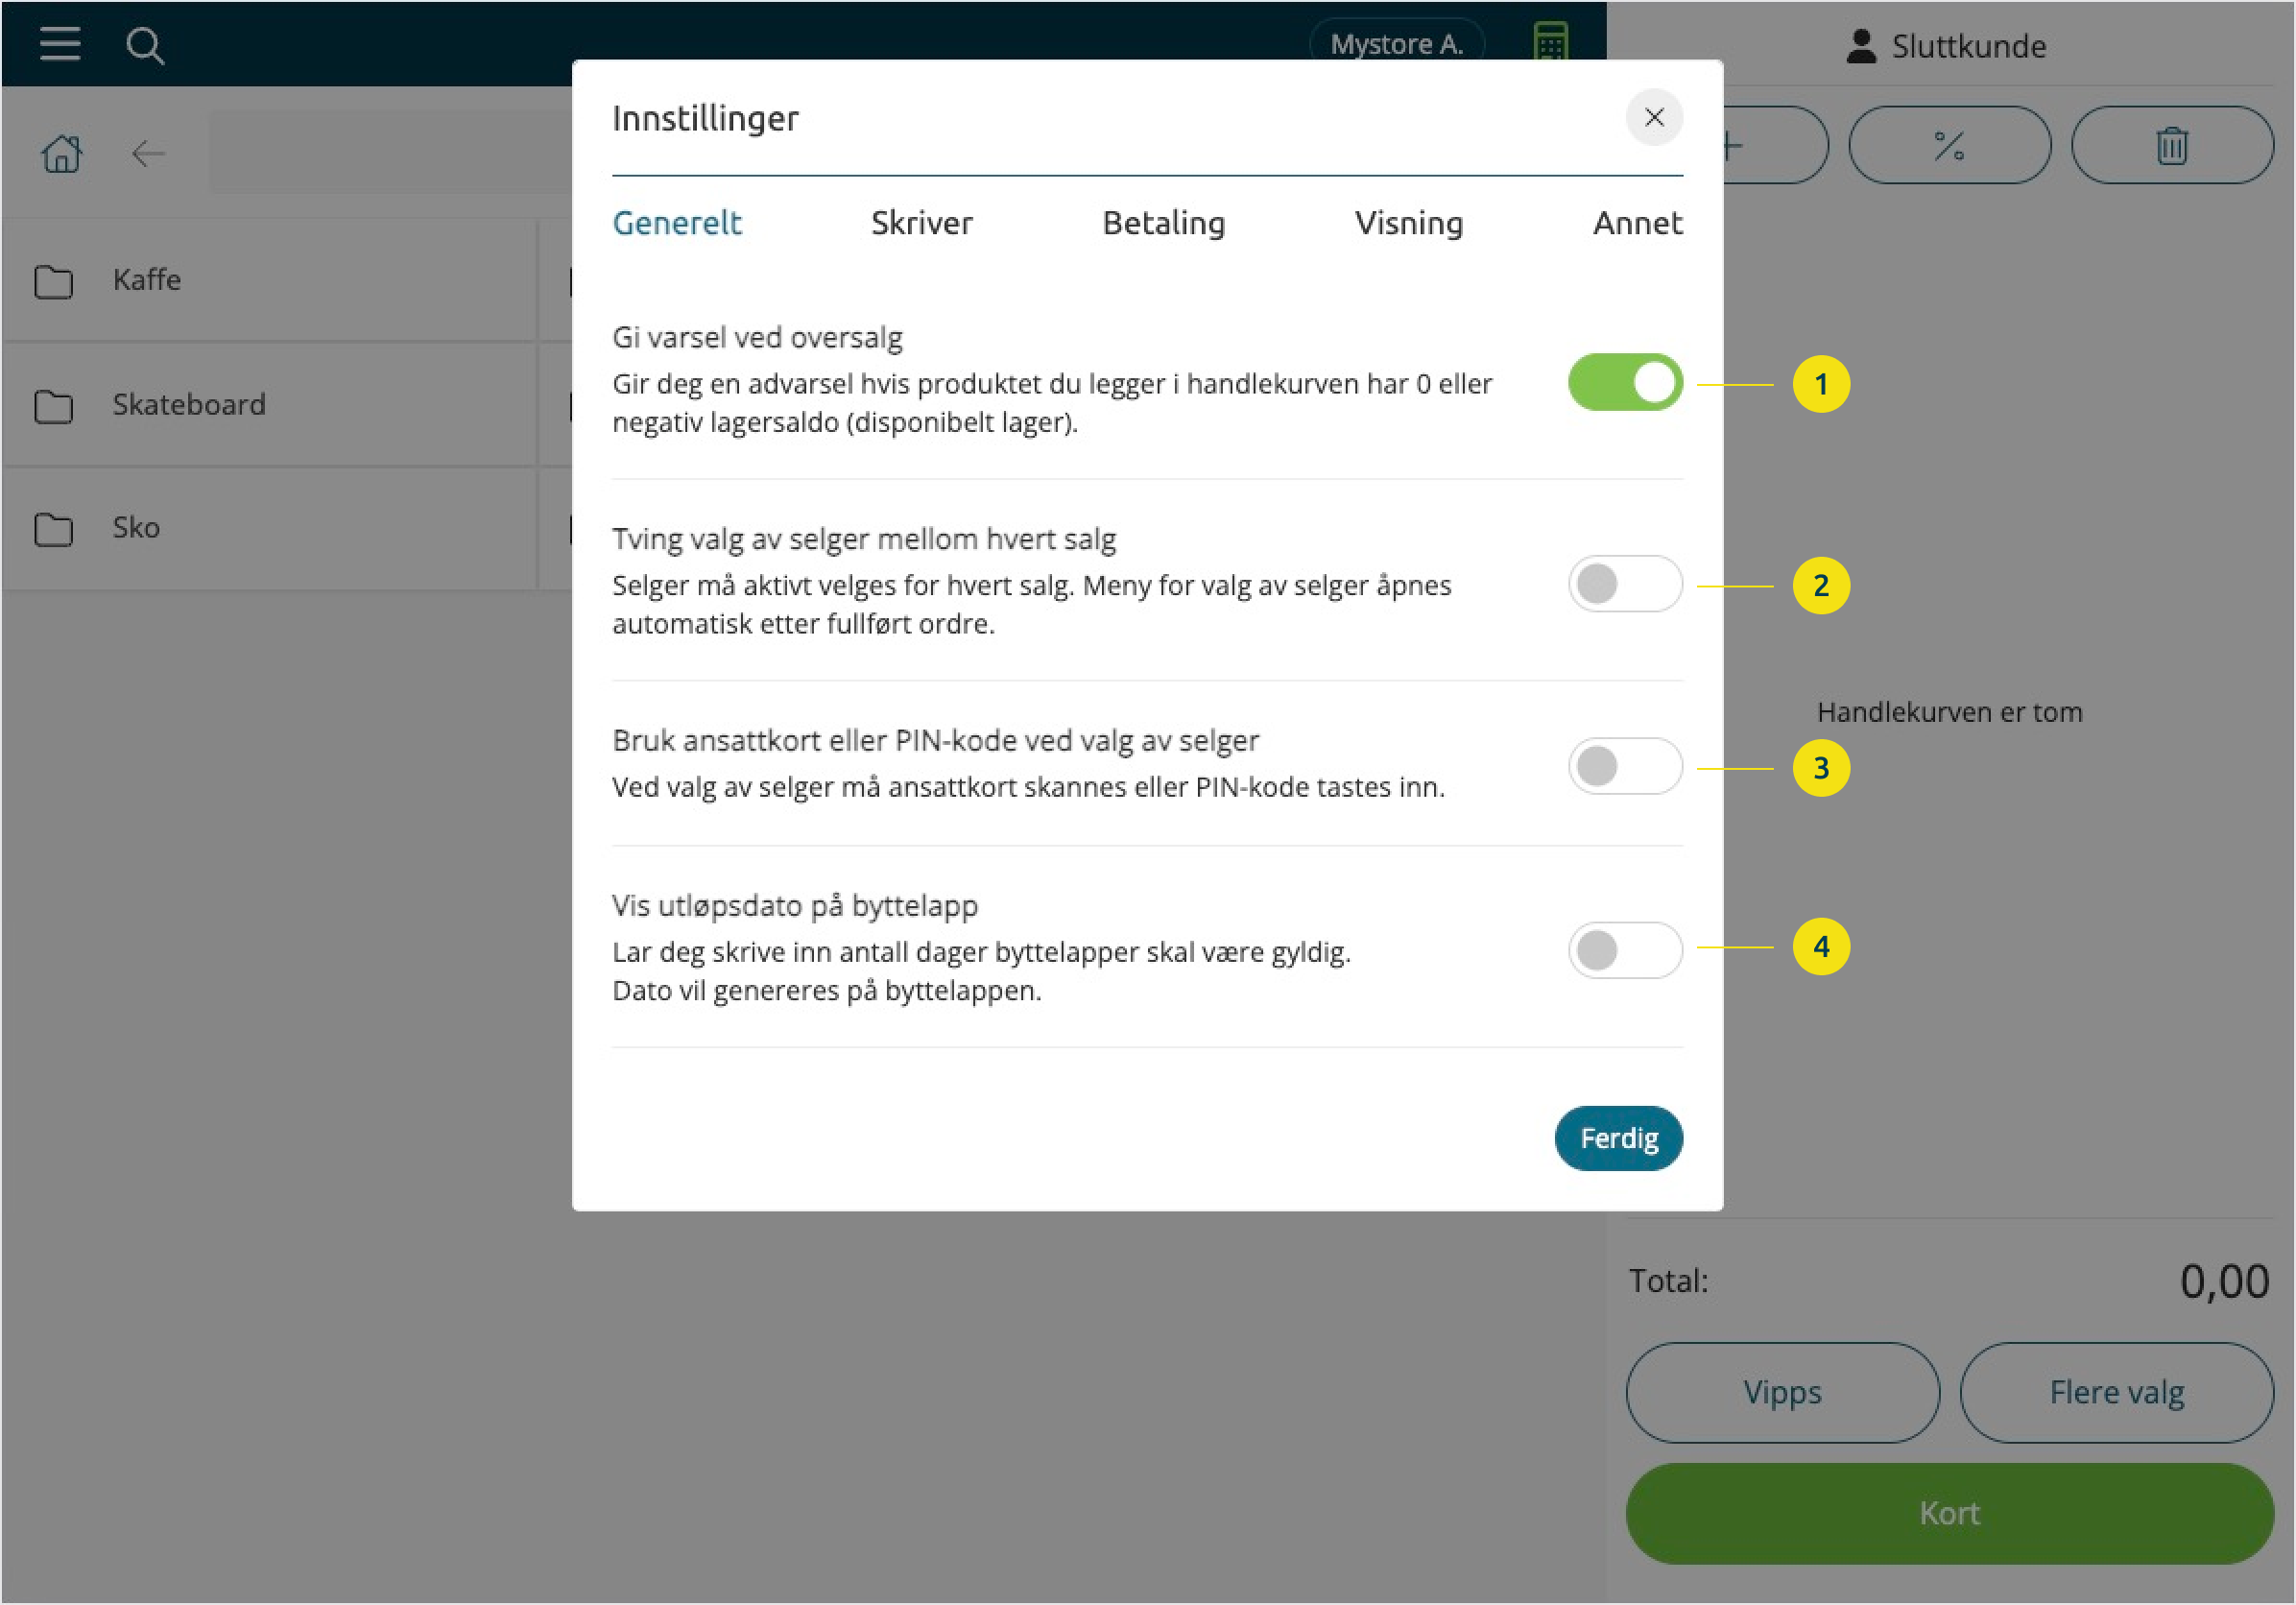
- Gives you a warning if the product you add to the shopping cart has 0 or negative stock balance (available stock). You can then choose whether to cancel the sale or continue
- With this turned on, the seller menu will automatically open after a completed sale/order. Alternatively, the modal for employee card/PIN code (point 3), if this is activated
- Seller is selected by scanning an employee card or PIN code
- Allows you to set an expiration date on the exchange notes. Enter the number of days or choose a specific date.
Printer

- Allows you to connect to a receipt printer
- Turn this on if you want automatic printing of receipts after each sale. The printer must be connected
Payment
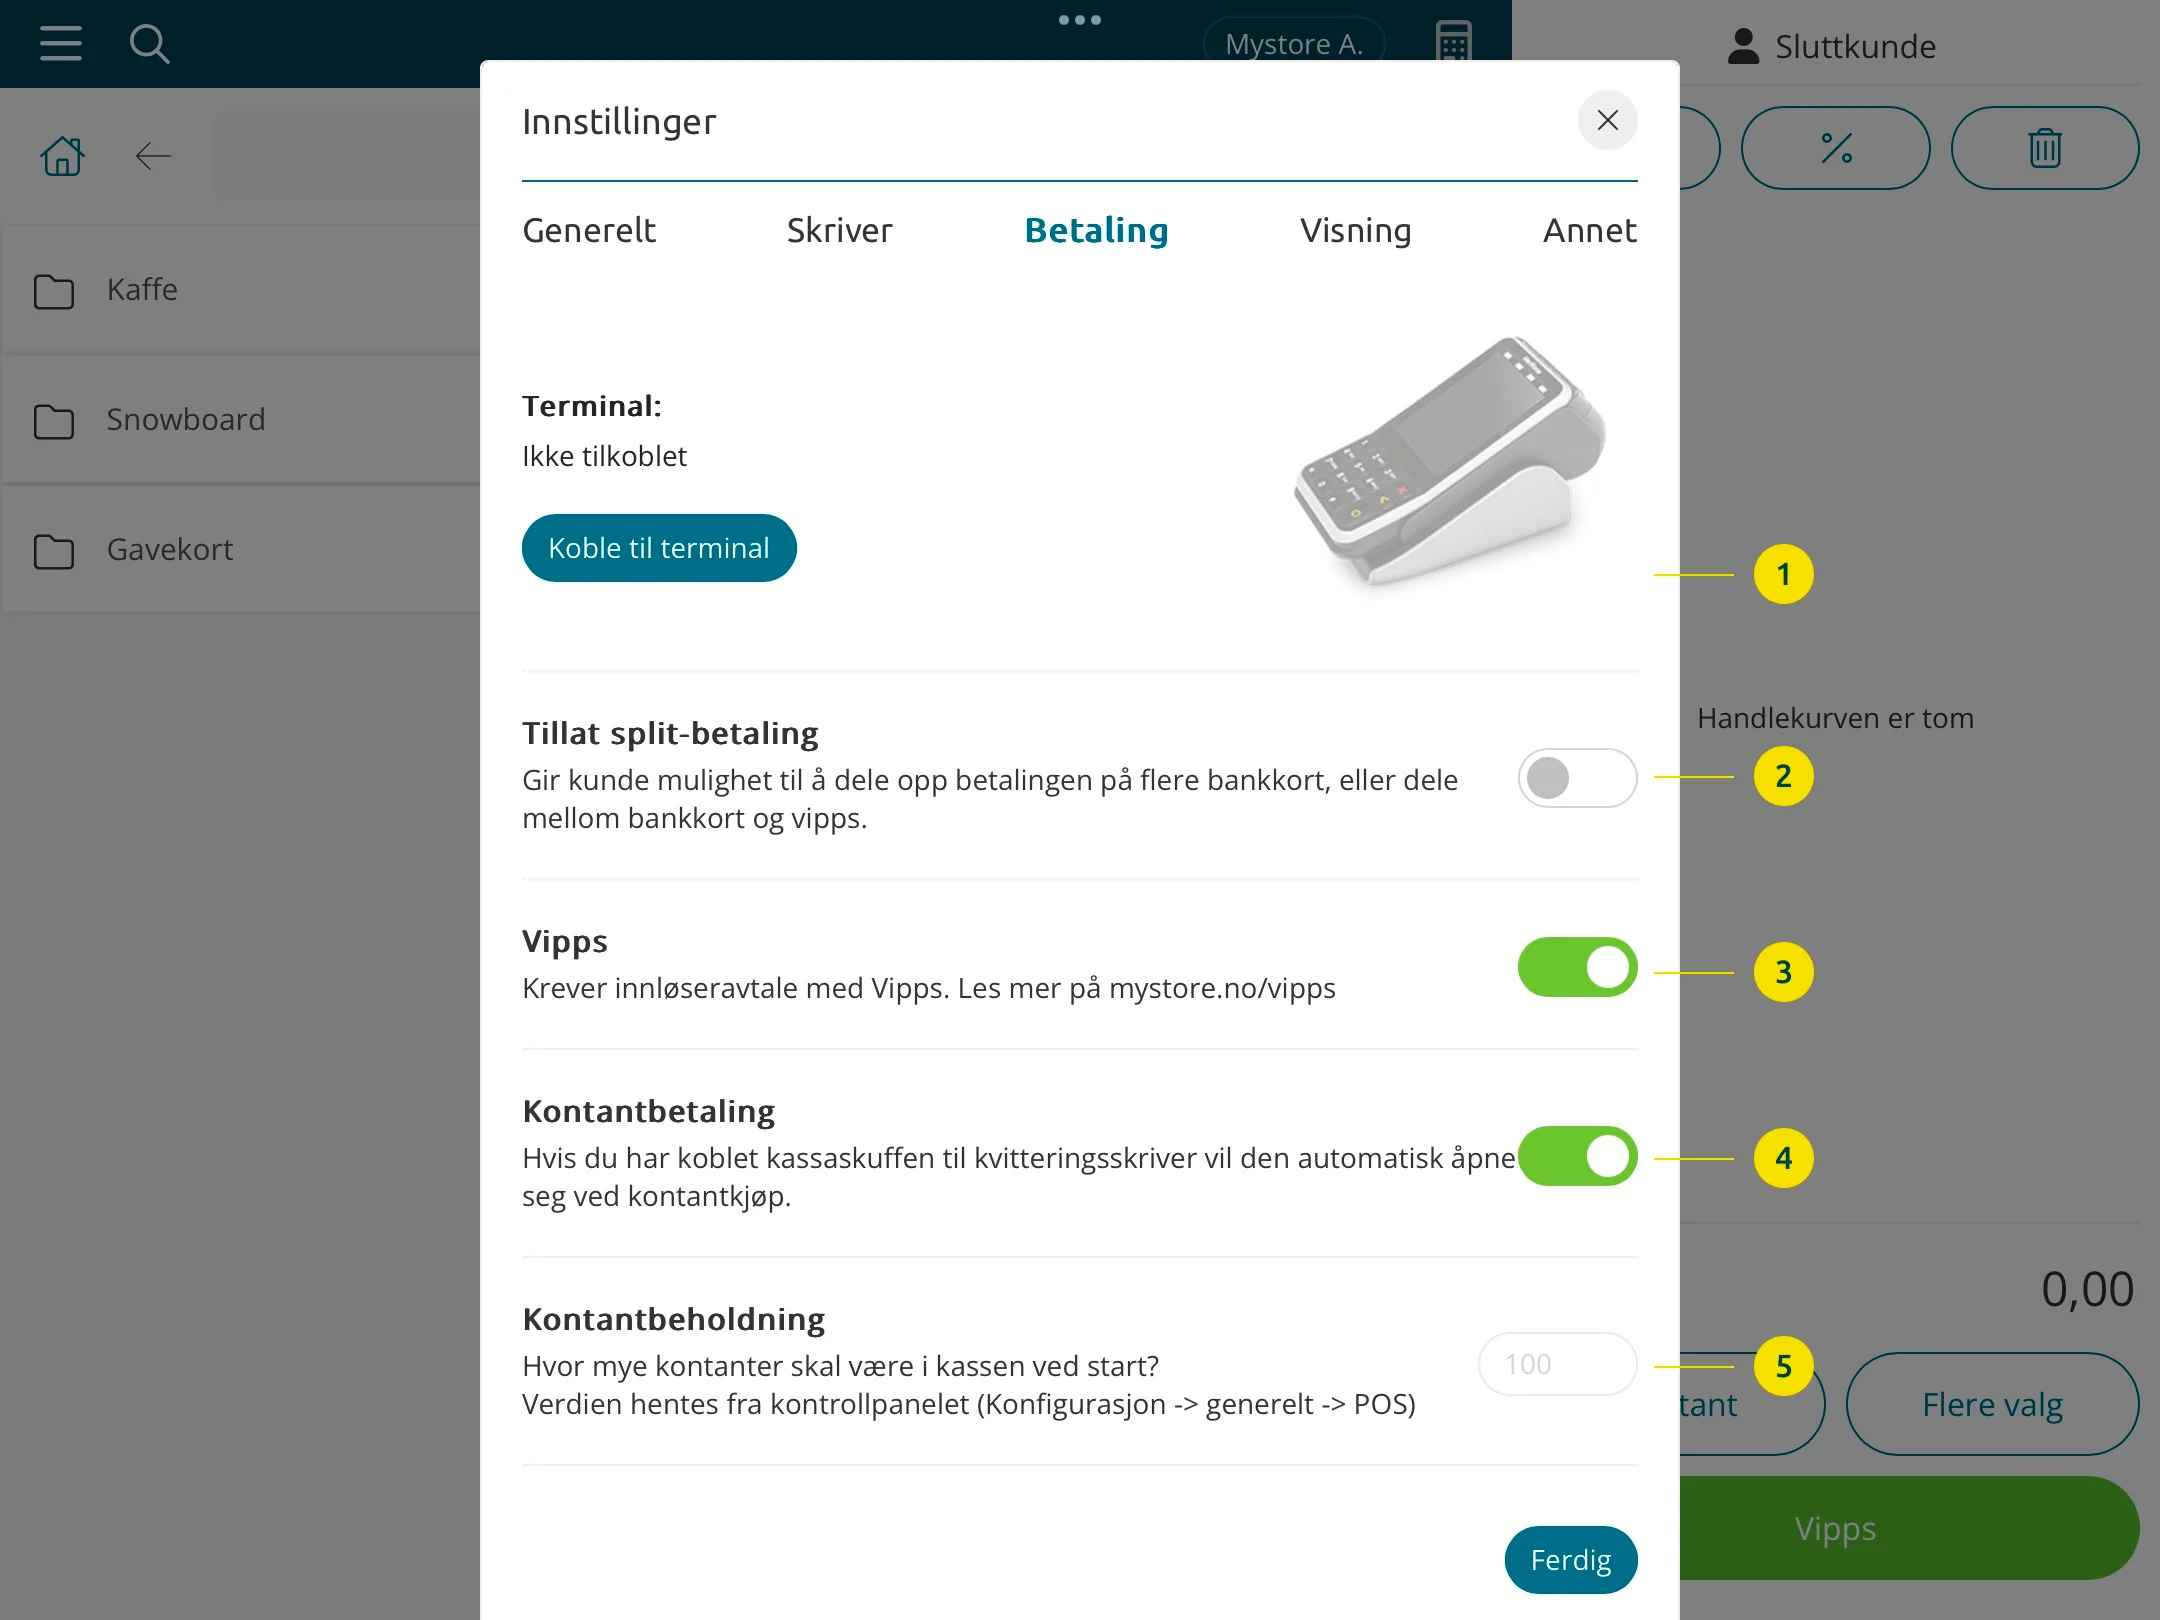
- Opens terminal settings where you can connect, disconnect, or change the bank terminal
- If you want to offer customers the option to split the payment on multiple bank cards, or split between bank cards and Vipps
- Cash payment must be turned on to receive cash. If this is turned off, Cash disappears from the payment methods. If you have a cash drawer connected to the POS system, the drawer will open automatically when the order is rung up on the payment method Cash
- Desired cash balance at startup/shutdown. The amount is set in the control panel via Configuration > General > POS
Display
- Activates self-service mode
- Option to show product images in the shopping cart
Other
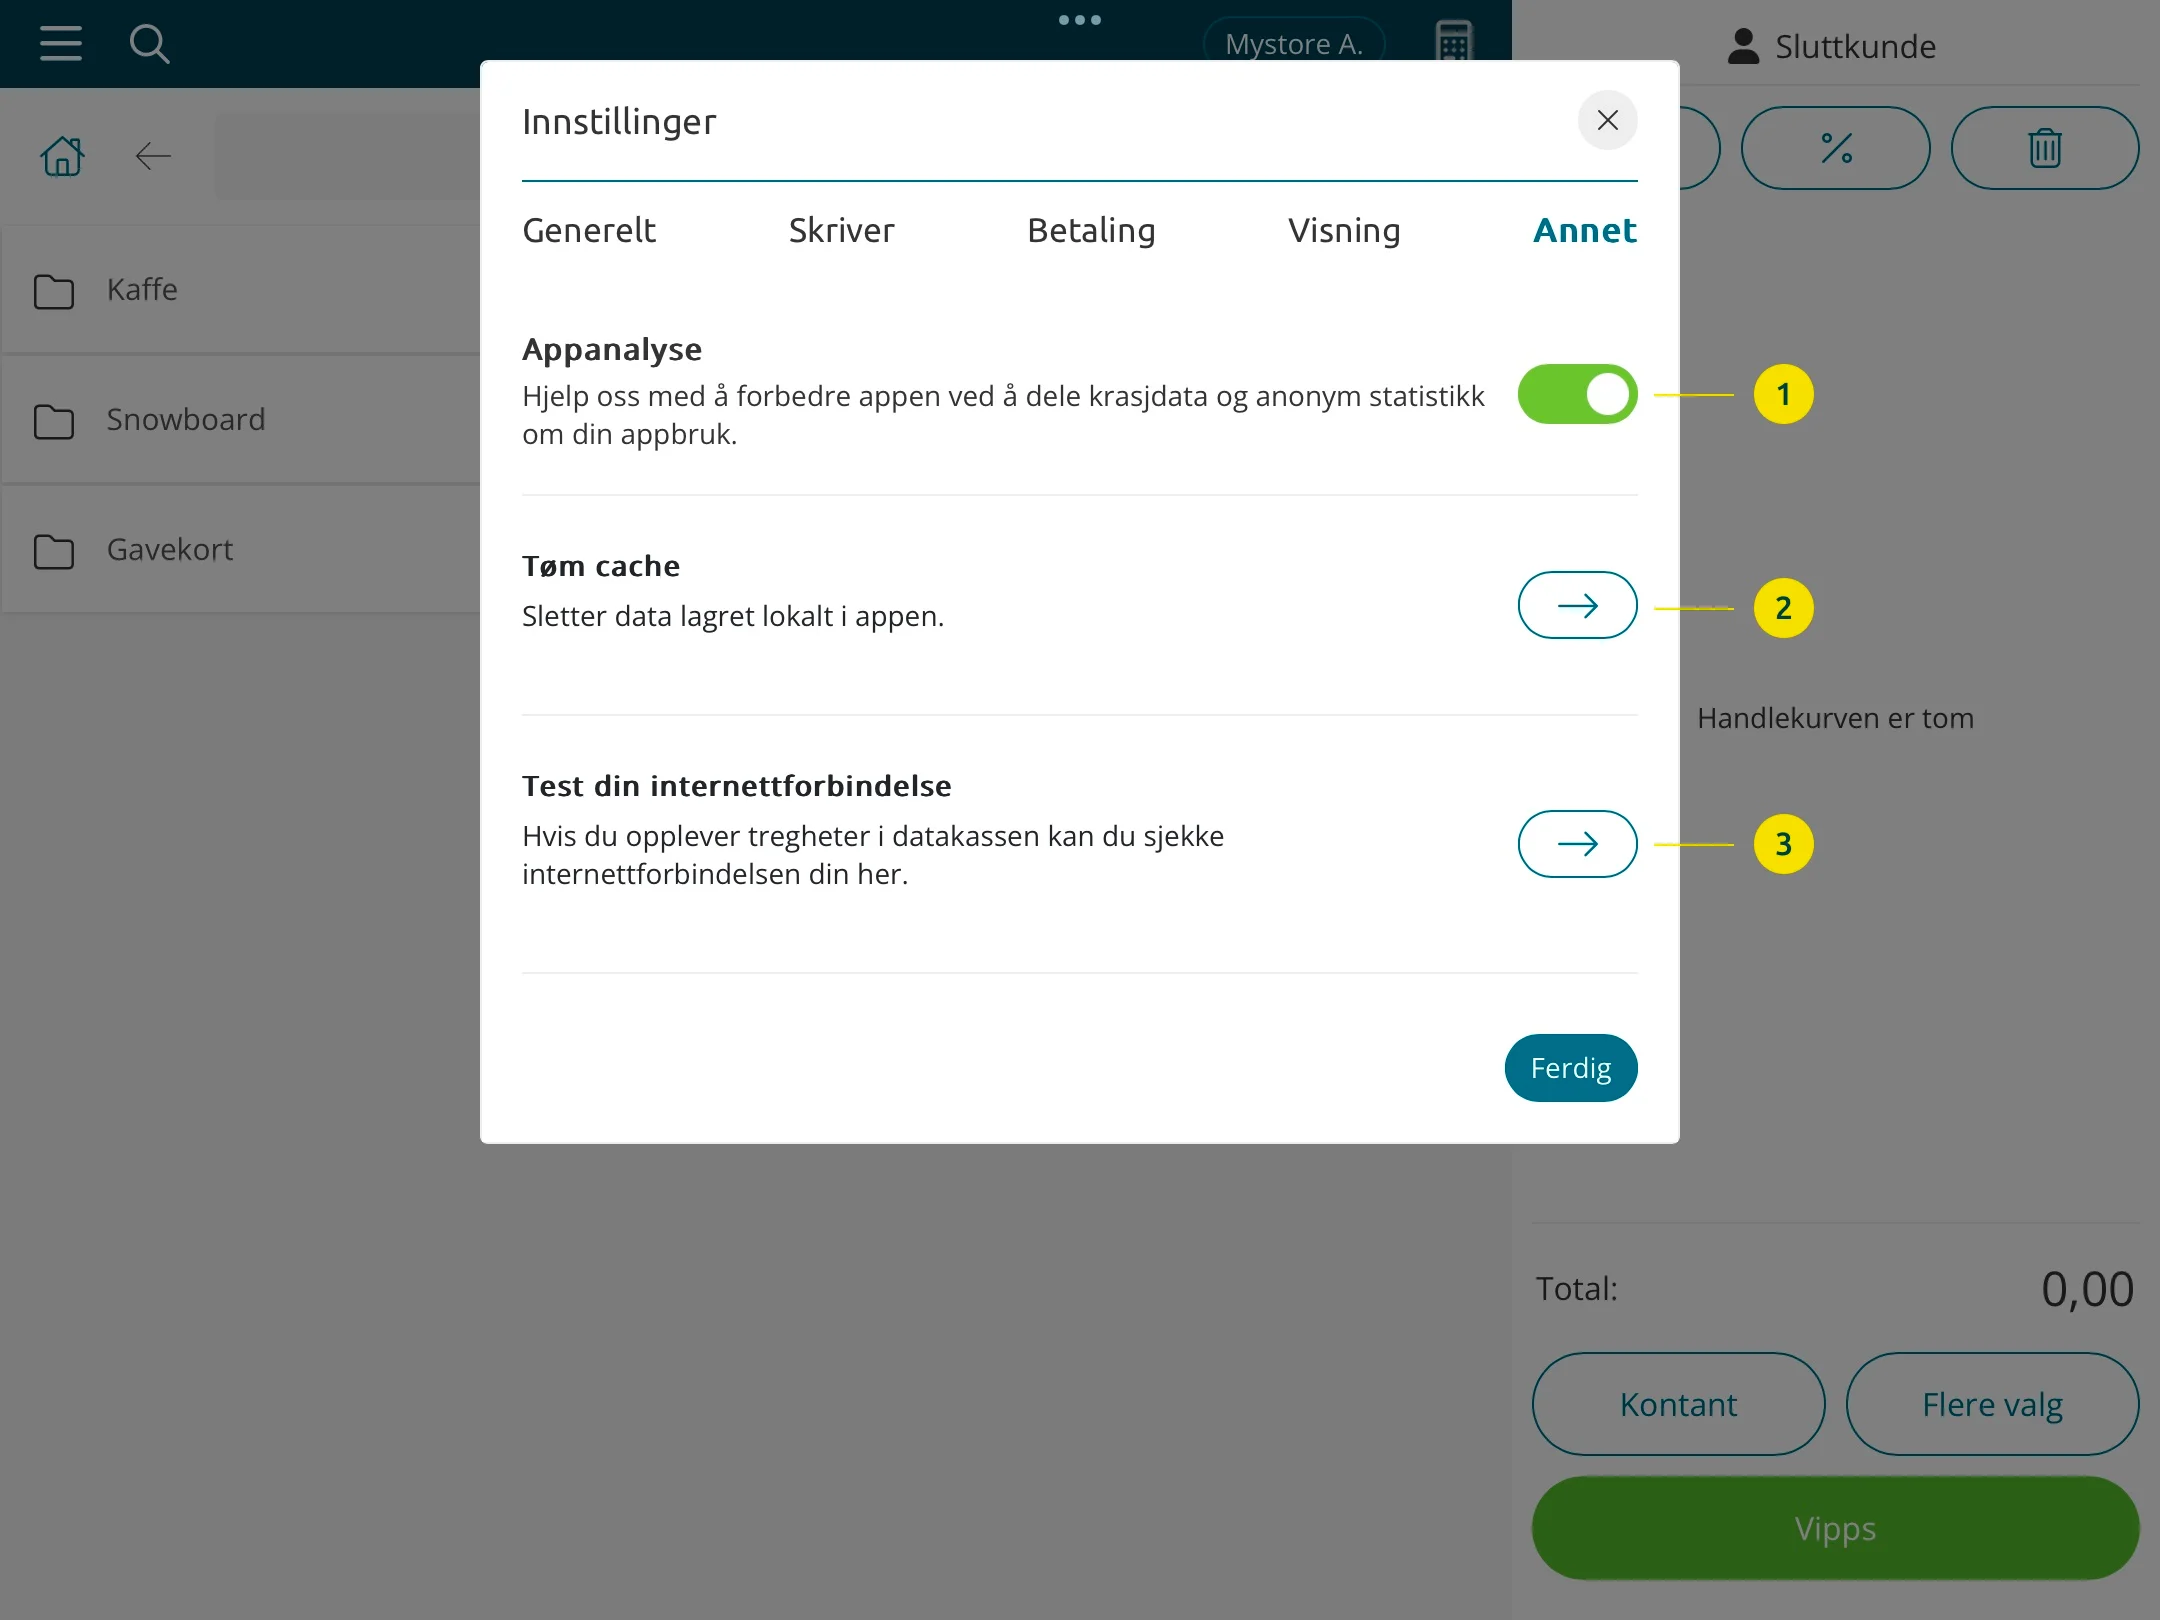
- The analysis information and statistics are collected in a format that does not identify you personally. The purpose is to help Acendy improve the product and service
- Deletes data stored locally in the app. We do not store any booked information locally in the app. To comply with the Cash Register System Regulations, all information is stored in the store's control panel. This is located at [storename].acendy4.no/controlpanel. All information is available in the control panel and at all times available to the store owner and potentially the tax authorities for control
- Here you can check the status of your internet connection
Category Selection

- Closes category selection (saving occurs continuously)
- Resets all customizations of categories and favorites
- Closes category selection (saving occurs continuously)
- Indicates that the category has several levels (subcategory). Click the arrow to go to the subcategory
- Mark the star to set the category as a favorite
- The switch/button determines the display of the category in the POS system. If you want to hide a category, you can turn off the display here
Latest Orders
Click on the menu item Show latest orders in the main menu to open the modal
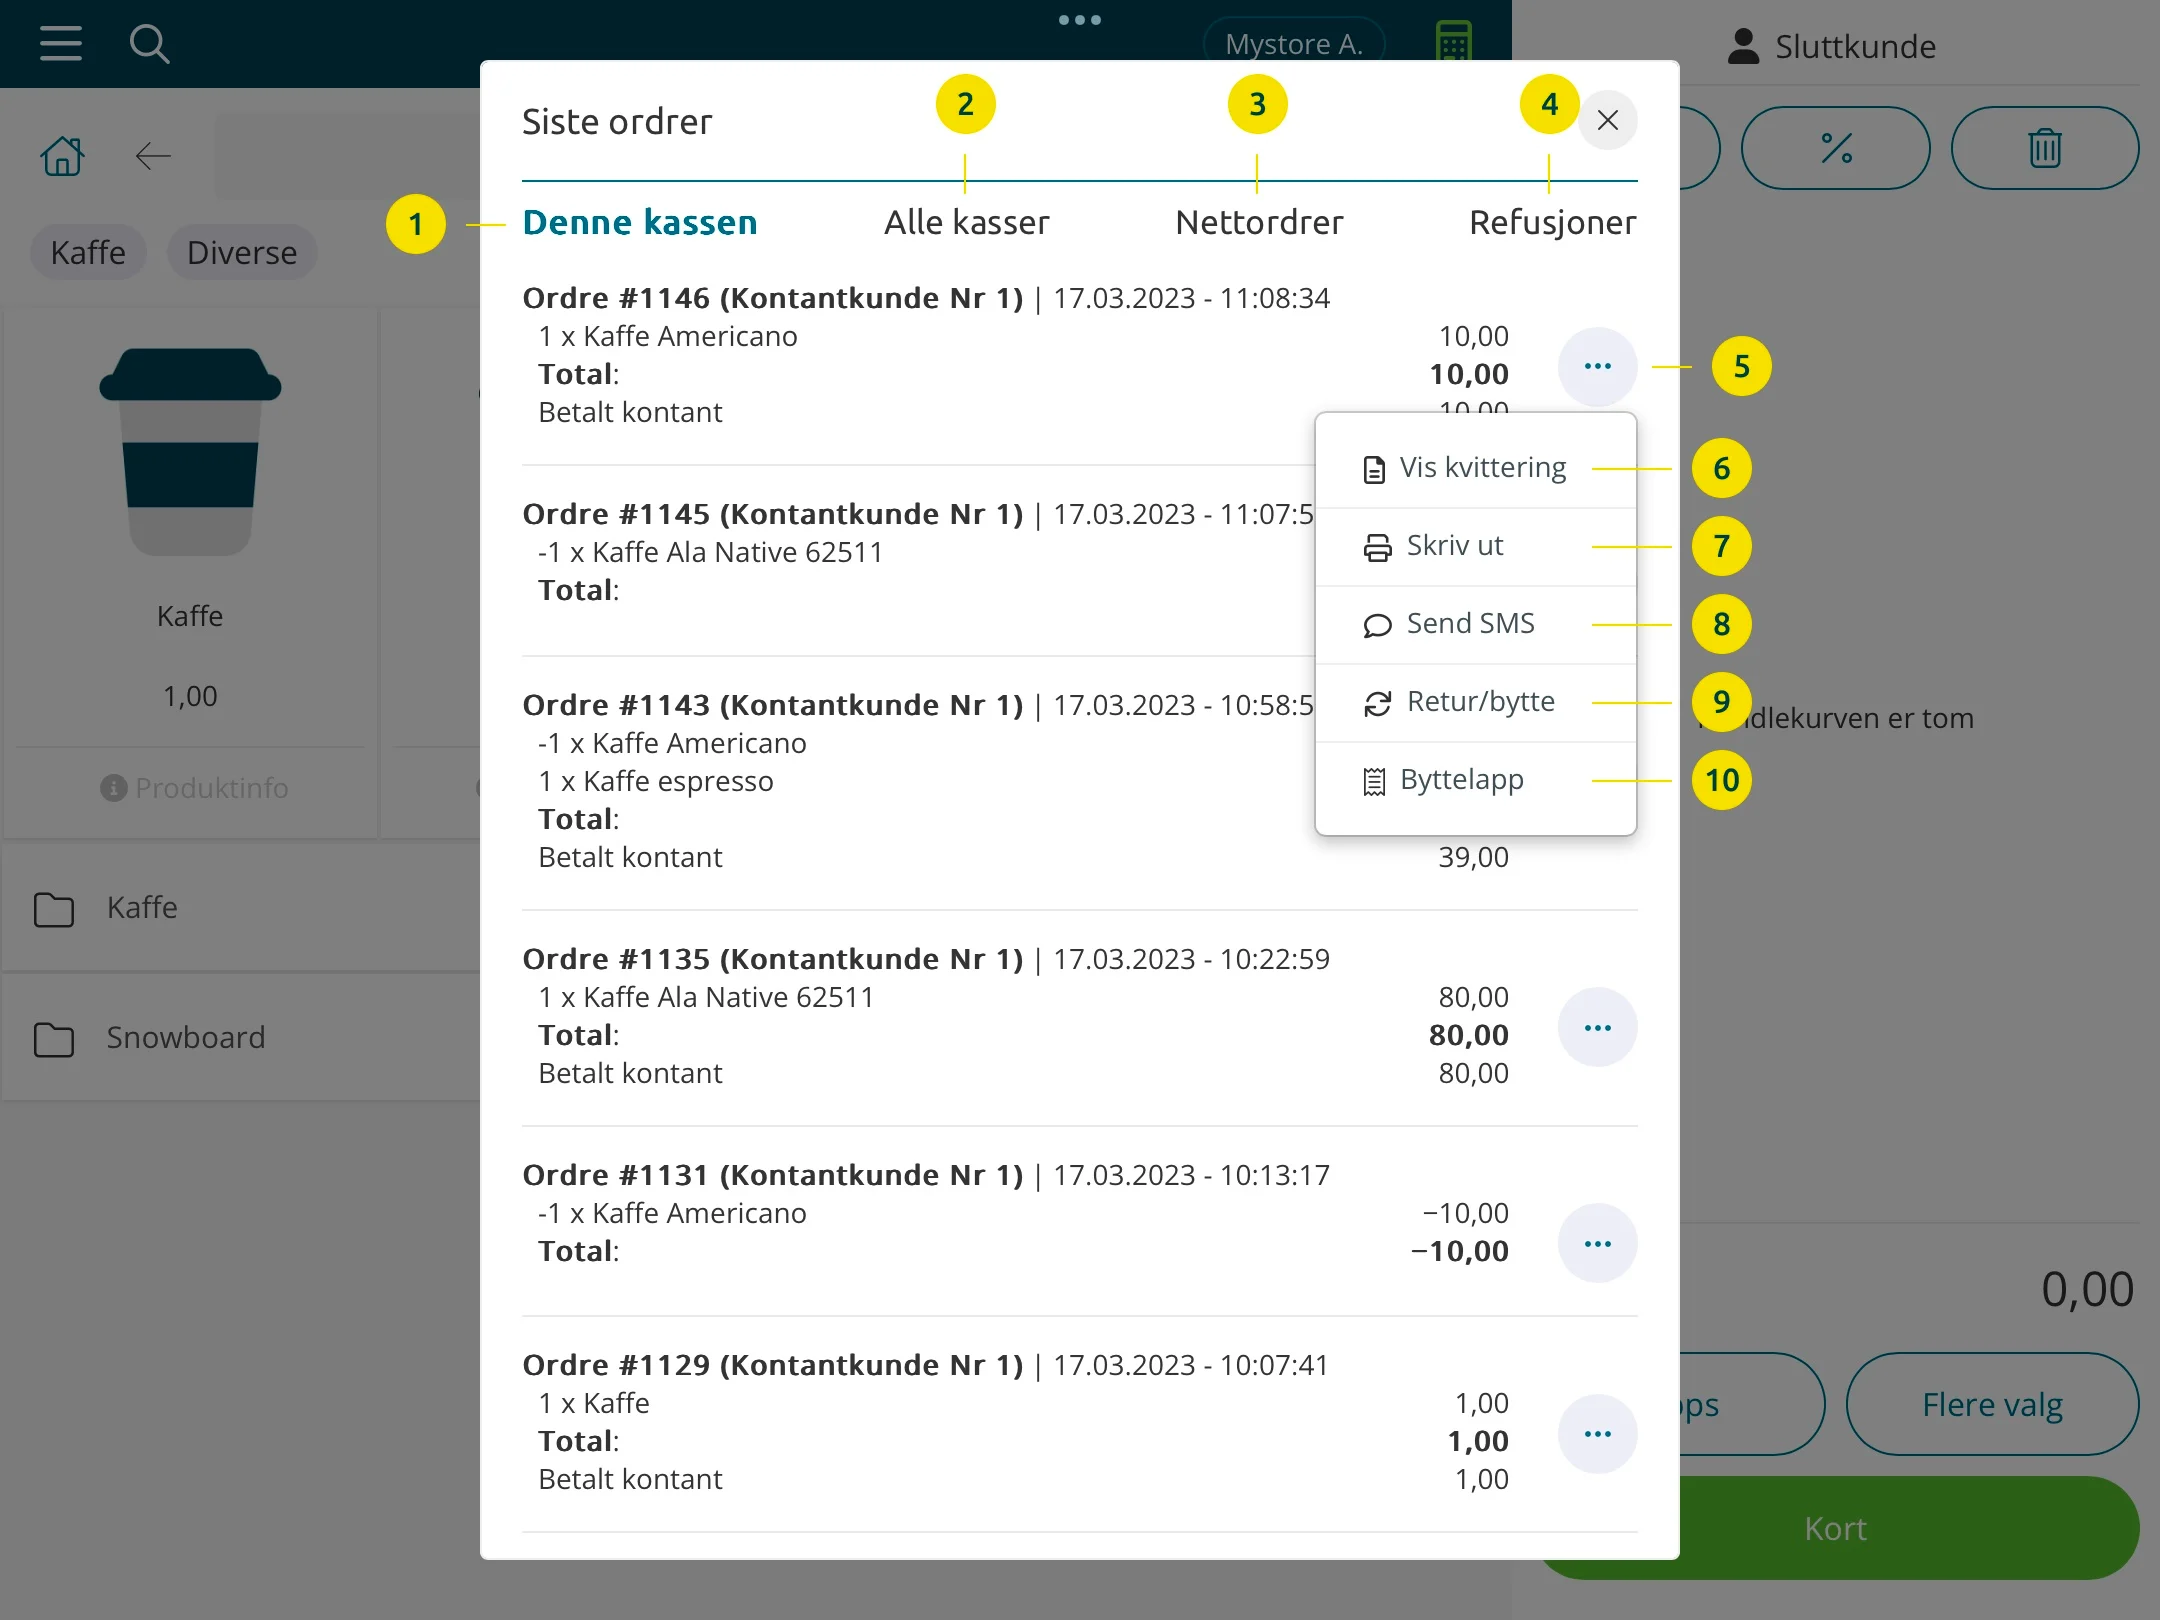
- Shows the latest orders from the cash register you are processing
- Shows the latest orders from all POS locations (if multiple)
- Shows the latest orders from the online store (if you also have an online store)
- Shows the latest refunds to bank cards
- Opens more options per order
- Shows the receipt for the order
- Prints a copy of the receipt (receipt printer must be connected)
- Sends a copy of the receipt via SMS
- Register a return/exchange on all or part of the order
- Opens options for an exchange note. Print an exchange note for all or part of the order
Search for an Order (to Register a Return)
Click on the menu item Search for an order in the main menu to open the modal

- Field to enter the order number or the barcode at the bottom of the physical receipt
- Closes the module
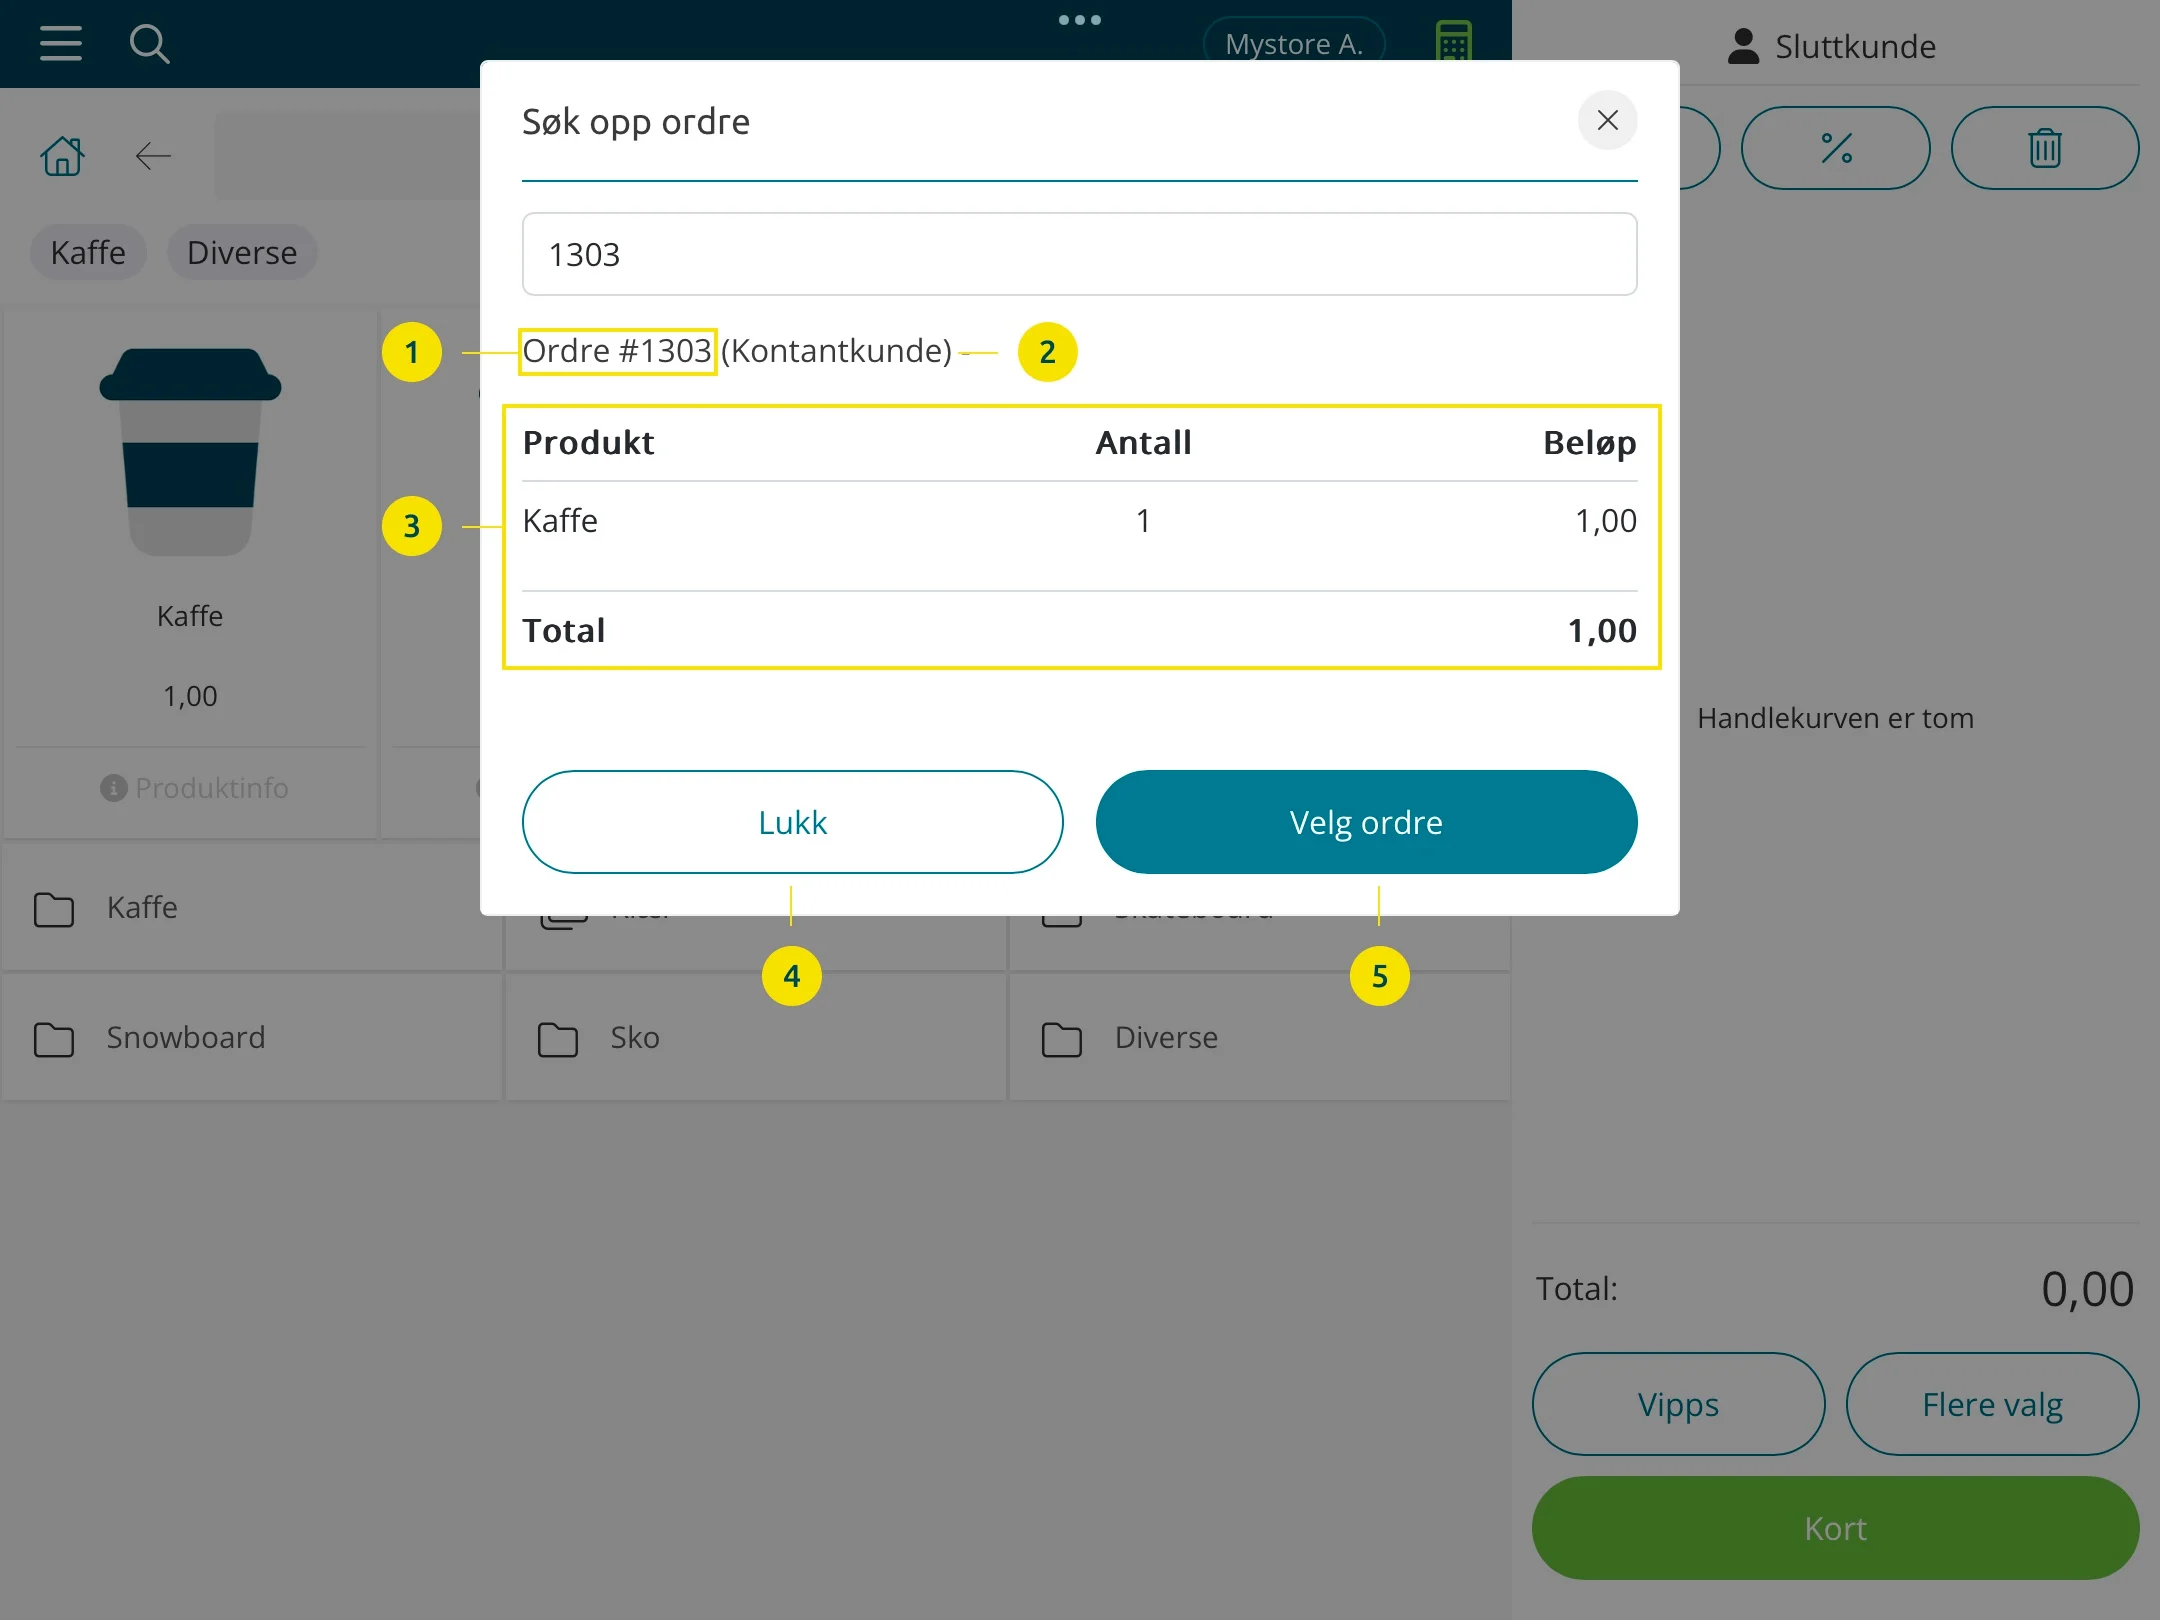
- Order number
- Customer name
- Order info/data
- Closes the modal and cancels
- Continue to return processing of the given order
Select/Change Seller
This function allows you to select a seller/user in the POS system using a PIN code, scanning an employee card, or via a menu display. You can choose whether the seller is selected/changed as needed, or whether it should always be selected after each sale.
This is set up via Main Menu > Settings > General.

- Force selection of seller between each sale
If this option is on, the seller menu or PIN code/employee card scanning will open automatically after each sale. Whether it is the seller menu or PIN code/employee card is determined in the option below - Use employee card or PIN code when selecting a seller
If this option is off, the seller menu will be valid. If the option is turned on, the PIN code/scanning of employee cards will be valid.
Selection of Seller Via Seller Menu
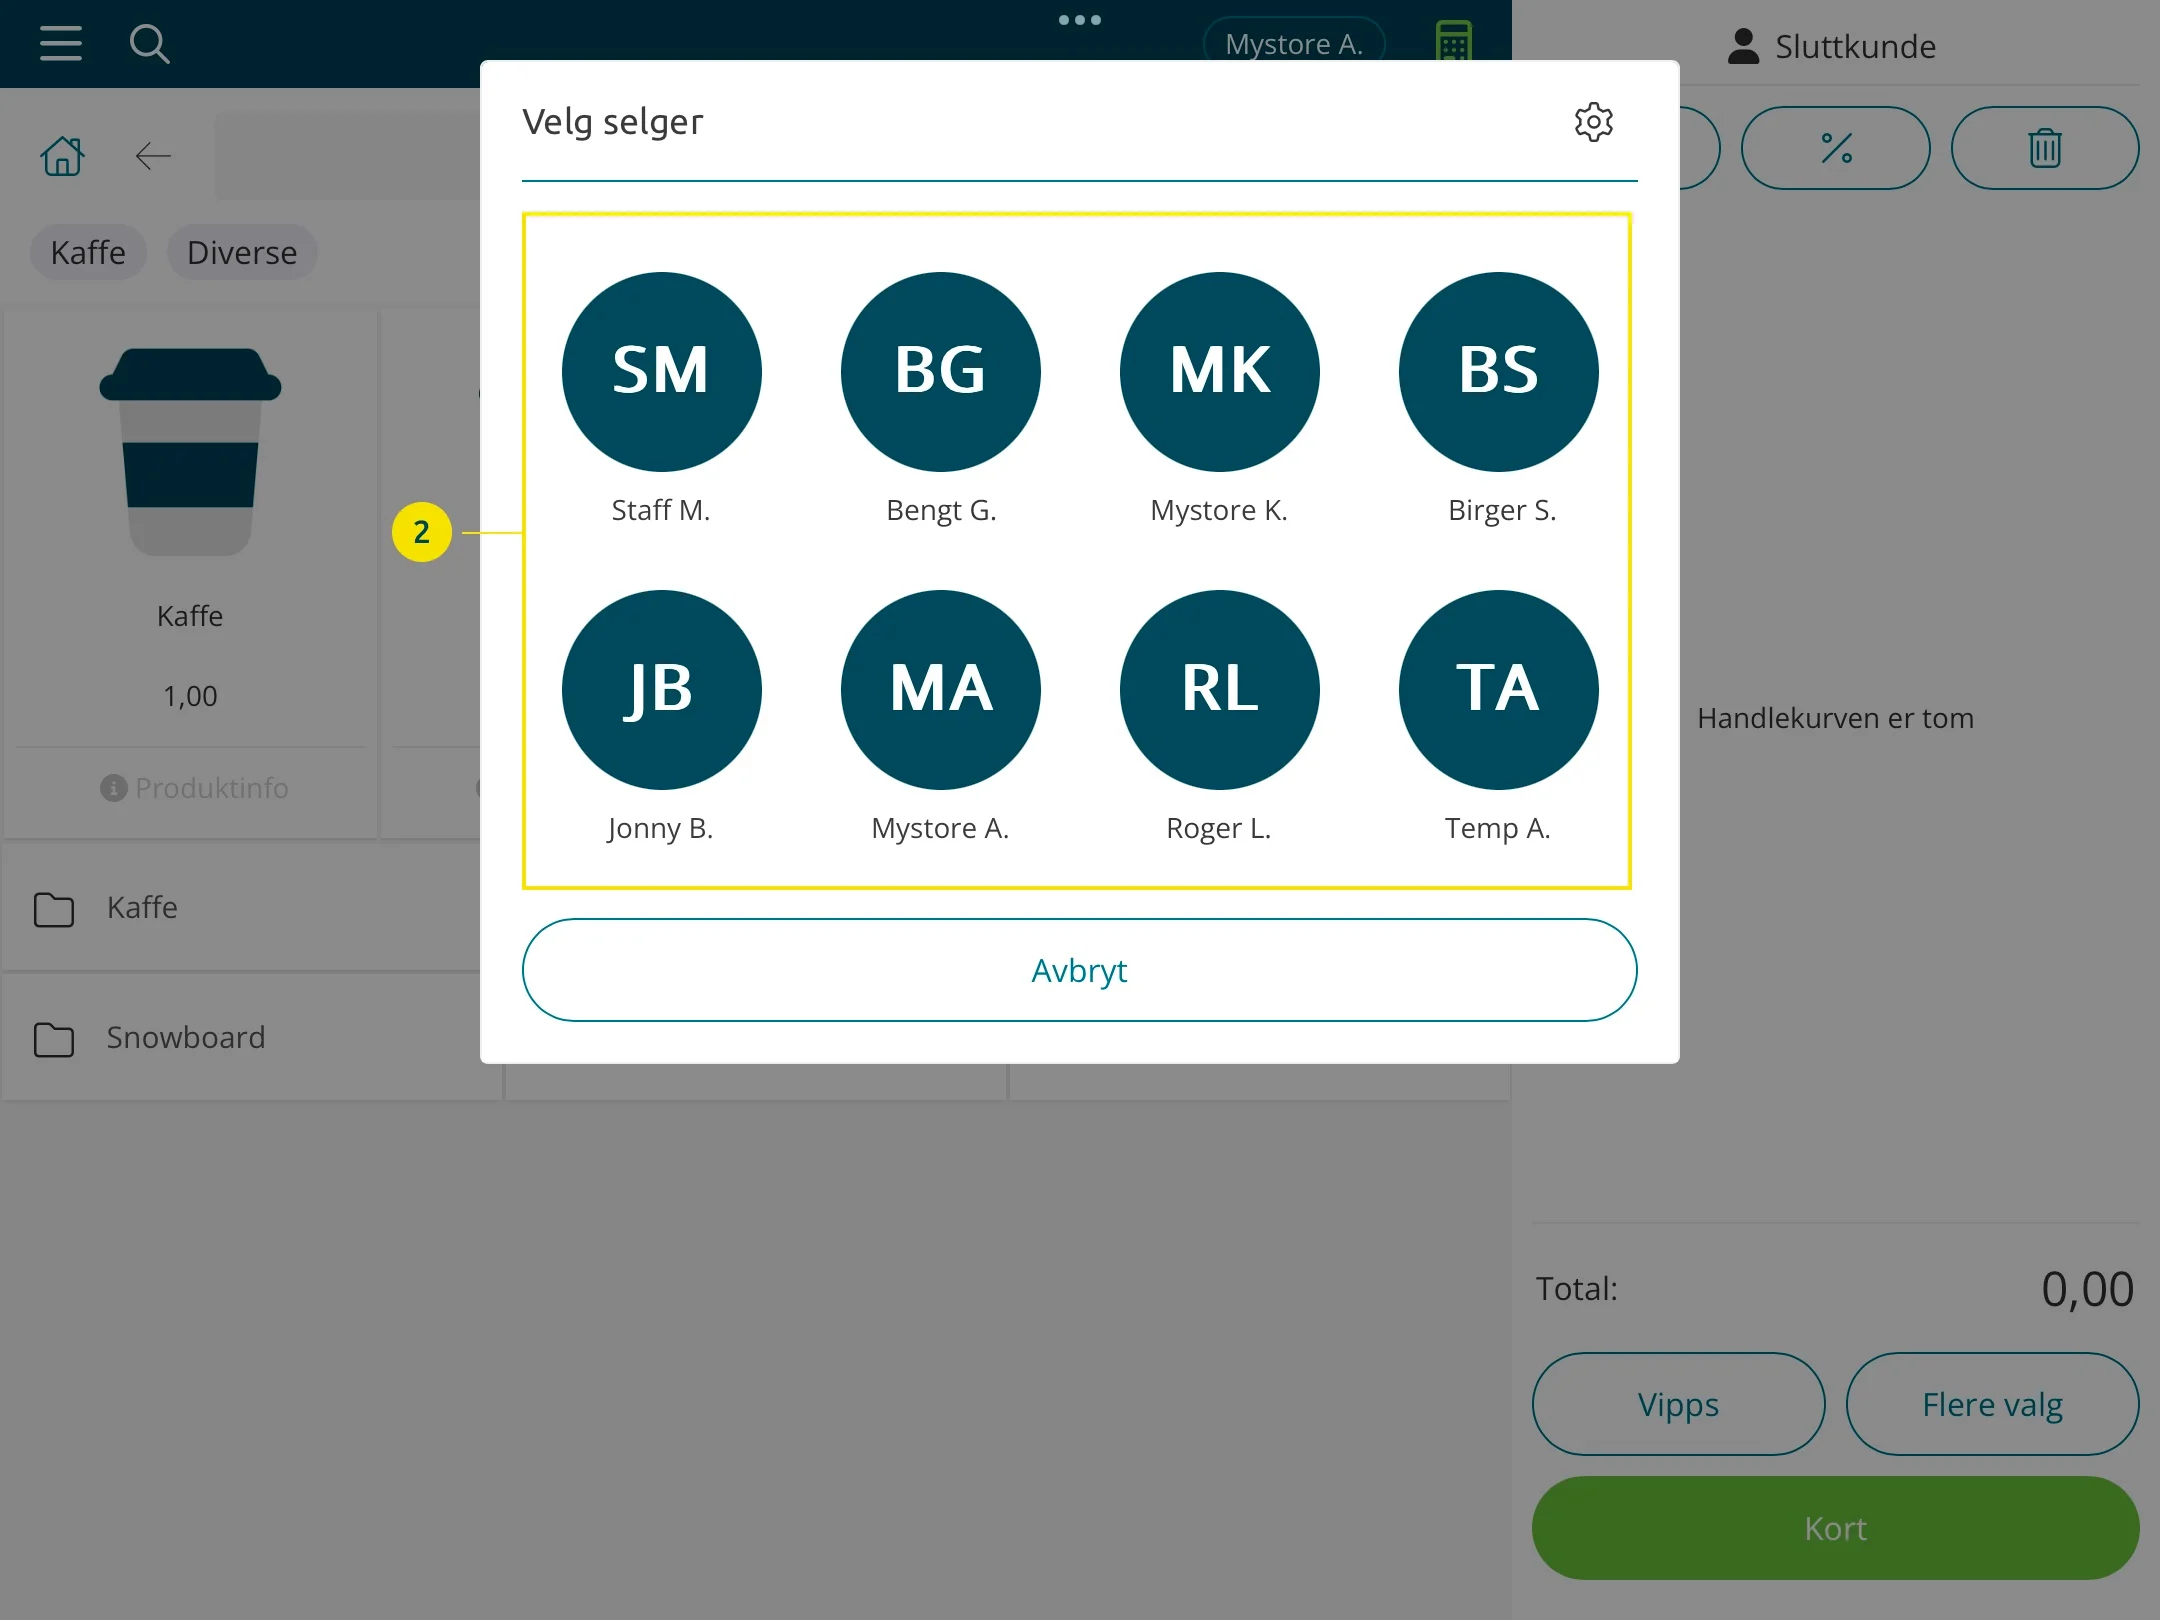
- Click the seller button at the top of the app. The seller menu opens
- Click on the desired seller
Can I Hide Users From the Seller Menu?
If you have many users/administrators who are not sellers in the POS system, you can choose to hide them from the seller menu.

- Click the seller button at the top of the app. The seller menu opens
- Click the settings icon in the top right corner of the seller menu
Here you can choose which users should be visible in the seller menu. This is only visual; the users will not be deleted/deactivated.
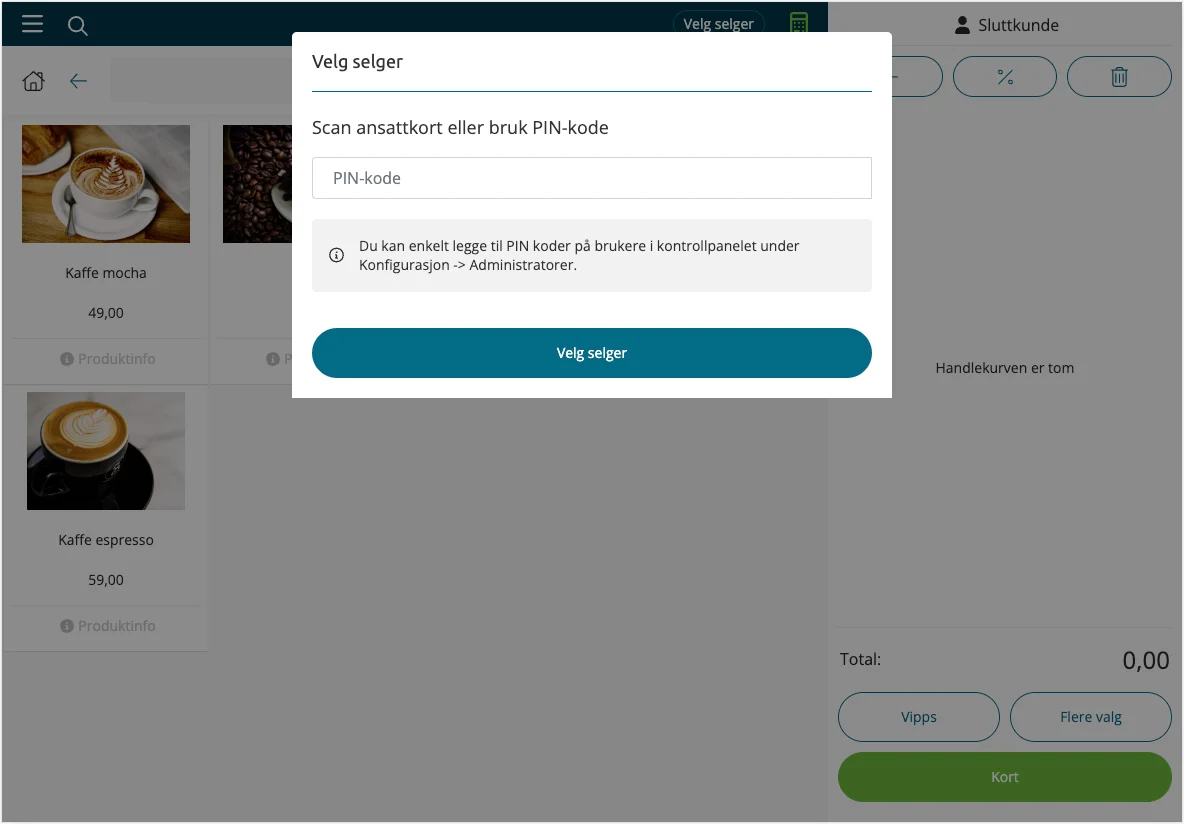
Selection of Seller Via PIN Code or Employee Card
Activate Use employee card or PIN code when selecting a seller via Main Menu > Settings > General.
When selecting a seller, you will now see this modal:
How to Add PIN Codes to Users
Under Configuration > Administrators (in the control panel), you can enter a PIN code for the different users of the POS system.
1. First select the user and click Edit:
2. Then enter a unique 4-digit PIN code for the user and click Save:
Start and Stop Cash Register Sales
To start the cash register sale for the day, go to the main menu and click on the menu item Start cash register sale.
To generate the Z-report and end the cash register sale for the day, go to the main menu and click on the menu item Stop cash register sale.
The Z-report is generated and sent to the administrator's email address.
The report is printed automatically from the receipt printer if the printer is connected.
You can also find the Z-reports in the control panel under Reports > POS > Z-report.
Terminal Settings
Used to set up your terminal.
See the following article for more info.
Connect Printer
Read how to install the printer in our help center
Booked Information
We do not store any booked information.
To comply with the Cash Register System Regulations, all information is stored in the Acendy control panel under Reports > POS.
All information is available in the control panel.