
Campaign Center
Introduction to the Campaign Center
With the Campaign Center, you can plan in advance which offers you want to provide to your customers. This is especially useful for high activity periods, such as Black Week, where you might want different offers each day:
- Monday: 15% on ski equipment
- Tuesday: 20% on tents
- Wednesday: 25% on winter cycling gear
- Thursday: 30% on winter clothing
- Friday: 40% on snowshoes
You can create all these campaigns in advance, and the Campaign Center will automatically activate and deactivate them at the specified times.
Important Information You Should Know
Before you start using the Campaign Center, there are some important points to note:
- No change of date/time after creation: Once a campaign is created, you cannot change the date and time. Always double-check that the start and end times are correct before saving the campaign.
- Not compatible with product packages: The Campaign Center does not work with product packages. This is because product packages are considered a form of "campaign" with a built-in discount, and they will not work with the functionality of the Campaign Center.
- Temporary price changes: Changes you make in the Campaign Center do not permanently affect the product prices in your product catalog. The offer prices are temporary and active only during the period the campaign runs.
Open the Campaign Center
To access the Campaign Center:
- Navigate to
Products > Campaignsin your control panel.
You will then reach the overview page, where all your campaigns are displayed.
- Filter campaigns: If you have many campaigns, you can use the search field
Filter campaignsto search by campaign name and/or date. The table updates automatically as you type. - Campaign overview: Campaigns are grouped into upcoming, active, and archived campaigns. The table shows the following information from right to left:
- Name
- Description
- Start date
- End date
- Number of products added to the campaign
- Dynamic options: The last column shows different options depending on the campaign's status. For upcoming campaigns, you can:
- View all products
- Add new products
- Duplicate the campaign
- Archive the campaign
- Manual activation/deactivation: To the right of the search field, there is an icon that opens a menu for instant activation/deactivation of campaigns. Normally, this is not necessary, as our platform handles this automatically. Use this manually only if absolutely necessary.
Create Your First Campaign
To create a new campaign, click on + Create campaign from the front page of the Campaign Center. The following information must be added:
Name and Description
- Name (required): The campaign name is for internal use only and is mandatory.
- Description: Optional description for internal use.
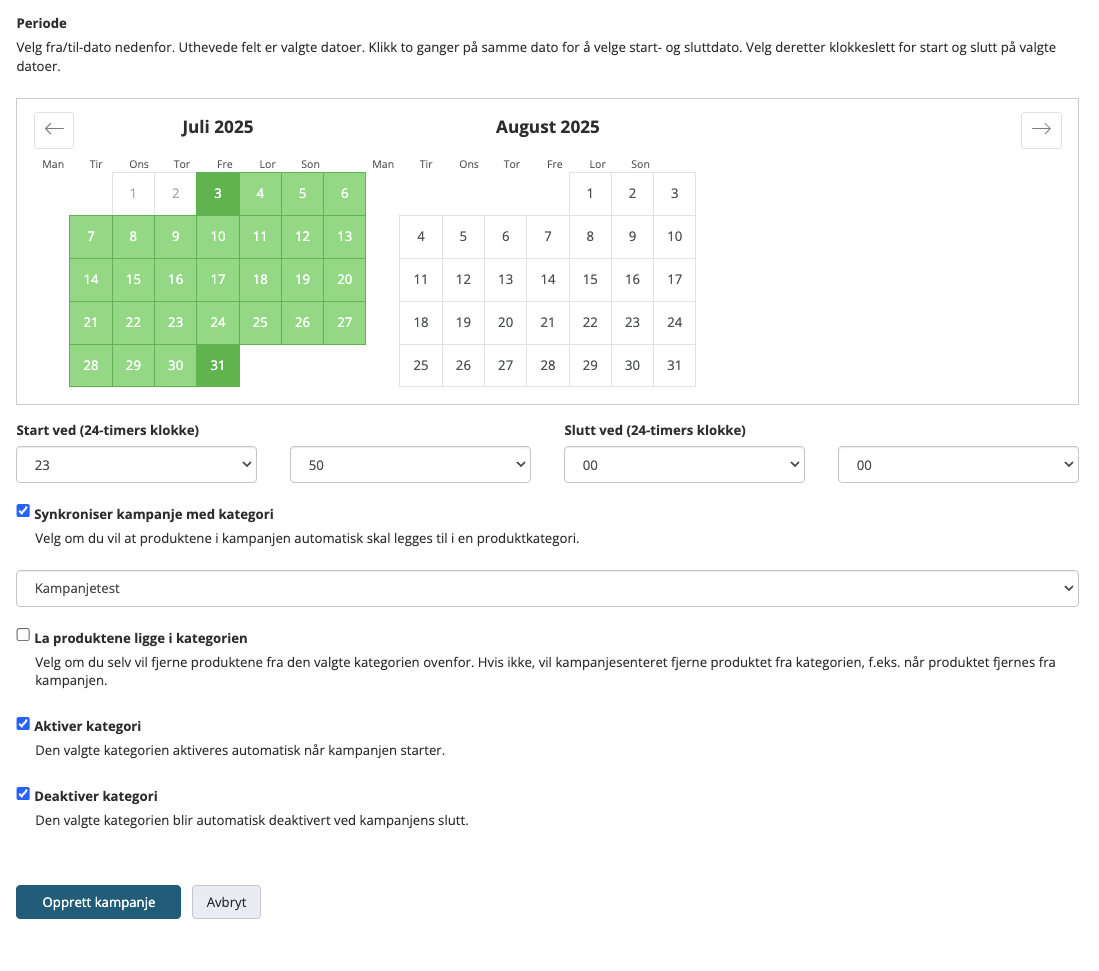
Time Period
- Select date period: Use the calendar to select start and end dates. Click twice on the same date if the campaign should have the same start and end date.
- Select time: Enter the time for both start and end dates.
- Future start: Campaigns must start in the future, at a minimum the next whole hour. The end date must be after the start date.
Overlapping Campaigns
You can create campaigns that overlap each other in time. However, it is not possible to add a product to a campaign if the same product is already included in another, overlapping campaign. You will be notified of this if you try to add an overlapping product.
Category
You can link the campaign to a specific category. This will automatically synchronize the products in the campaign to the selected category.
- Example: If you create a category called "Black Friday", you can link it to the "Black Friday" campaign.
- Synchronization: If you choose to synchronize the campaign with a category, you will see a dropdown menu where you select the category.
- Recommendation: To avoid products in the campaign being visible before the campaign start, we recommend placing them in their own, inactive category. At the campaign start, the campaign center can automatically activate this category and deactivate it again when the campaign ends. This setting can be made when linking a campaign to a category.
Read more about dynamic categories →
After filling in all the fields, click "Create campaign".
Add Products to the Campaign
After the campaign is created, the next step is to add products.
- Click on "Add products". You will then be taken to a page showing all available products you can add.
There are two ways to add products:
- Add all products: Click on
Add all productsto add all available products to the campaign. You will then automatically be sent back to the page showing the products that have been added to the campaign. - Add individual products: Click on the
Addbutton on each row in the table to add products one by one. Here, you can also set a specific offer price for the product (either a number for the price in kroner or a number with % for percentage change).
Filtering Products
If you have many products, you can use the filtering tools at the top of the page:
- Filter by: Manufacturer, category, or stock status. Changes you make here affect the table below.
- Add filtered products: Note that the button
Add all productschanges toAdd filtered productswhen you use filters. - Search field: On the right, you will find a search field where you can search for products by title.
When you have finished adding products, click Back next to the dropdown menus for filtering.
Manage Products in the Campaign
This page shows all products that have already been added to your active campaign.
- Add products button: Takes you back to the page where you can add more products.
- Next to this button is a small arrow pointing down. By clicking on it, you get extra options like
add all productsorremove all productsfrom the campaign.
- Next to this button is a small arrow pointing down. By clicking on it, you get extra options like
- Back to overview: The next button takes you back to the overview page for all campaigns.
Global Price Change
To the right, there is a field to make a global percentage discount on all products added to the campaign at once.
Product Table
The table shows relevant information about the products in the campaign.
- Article number: The product's article number.
- Name: The product's name. Click on the name to open the product in the control panel.
- Inventory: Stock balance
- Purchase price: The product's purchase price
- Price: The product's selling price (including VAT)
- Campaign price: The product's campaign price (after price adjustment).
- Profit: The "Profit" column shows gross profit in percentage. This value is shown only if a purchase price is registered for the product.
- Discount / New price: Here you can either add a percentage change or a new price
- A number with '%' for a percentage change (e.g.,
20%for a 20% discount). - An integer for a fixed offer price in kroner (e.g.,
199).
- A number with '%' for a percentage change (e.g.,
- Remove product: On the far right, there is a trash can icon that allows you to remove a product from the campaign.
- View the product in the online store: The house icon opens the product in a new tab
Note: All values in the calculation itself are exclusive of value-added tax (VAT). The prices shown in the Price and Campaign price columns are inclusive of VAT.